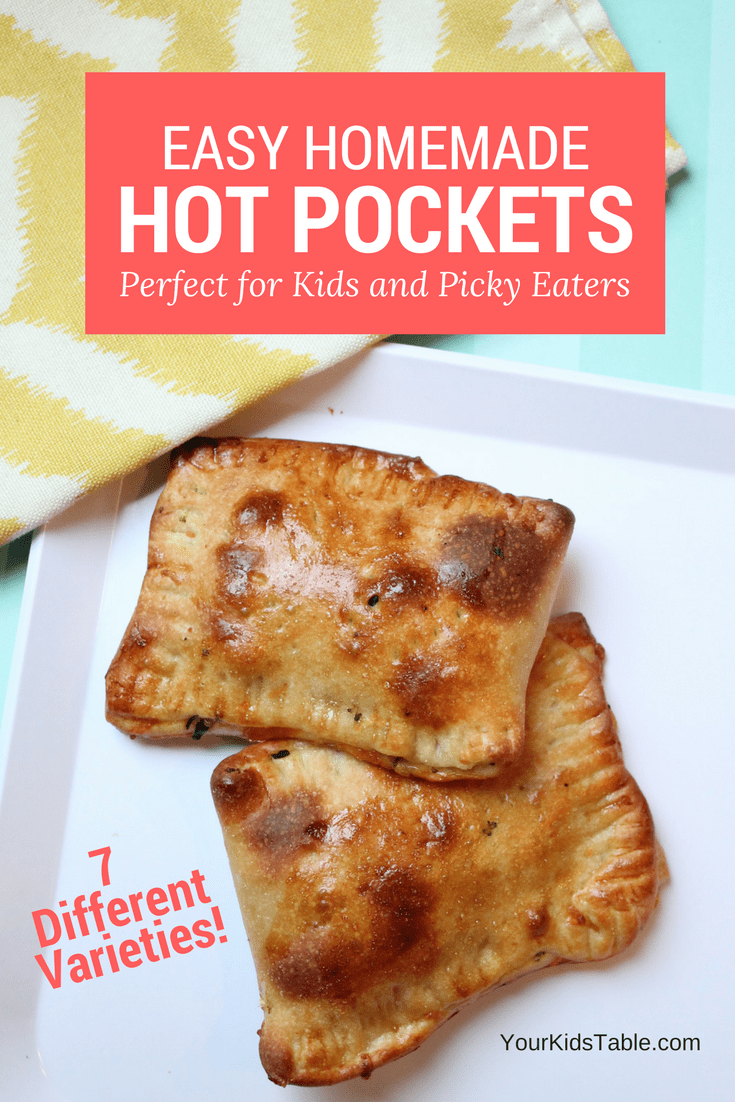
Try these easy homemade hot pockets for a family meal, perfect for toddlers to teens, and even picky eaters. Great ideas for vegetarian, pizza, ham and cheese and mini hot pockets. Yum!
Raise your hand if you have a kid that LOVES bread! I have three of them, and they’ll take bread any way they can get it.
Years ago, I realized I could use this love of bread to get my kids, especially my – at the time- very picky eater, to eat some new foods if I combined them with the bread he devoured. And, that’s when homemade hot pockets became a family recipe.
What’s really awesome about this simple recipe is that you can totally customize them to what foods your kids like or what you happen to have lying around in the fridge.
Why are Homemade Hot Pockets So Awesome???
Homemade hot pockets are a great meal for families for a lot of reasons. At the top of my list is that it’s a great way to get some vegetables into a child’s diet, and for them to learn that vegetables can taste really good. (Here are some more vegetable recipes for kids.) They’re also a perfect food to cook with your kids, from toddlers to teens, because it’s easy to have them help you safely, away from the stove, and they’re just fun to make. Kid’s that aren’t typically interested in cooking may feel different about these hot pockets.
Another bonus is hot pockets are a great self contained food that are easy for toddlers to eat! And, if you like to cook in large batches and freeze for quick meals later (even breakfast), these will work well for that too.
My feeding therapist mind loves these homemade hot pockets because they could be the dinner that your child tries something new, although you may have to give it a shot a few times, as is often the case with picky eaters. I already mentioned that the bread factor is pretty motivating for many picky eaters, but there are a lot of other special advantages this meal has.
First of all, the fact that what’s inside is hidden until they take a bite, make give them the guts to try a little a nibble.
While that statement may make it sound like I’m advocating tricking picky eaters, I’m not. I would never suggest lying to your child about what’s inside or trying to coax them to eat it (read about why that backfires in this picky eating article). But, the sight of different types of foods, in and of itself, can be very overwhelming for picky eaters.
To make homemade hot pockets a successful meal for picky eaters, there’s a couple of guidelines I’d suggest:
- Chop ingredients finely – mixed textures are notoriously difficult, as are big chunks for new foods. Chop everything to an even consistent mix of all the ingredients you’re using.
- Make your hot pockets small – smaller is generally better because it isn’t as overwhelming a big, hard-to-handle hot pocket. You can make them as small as a “pizza roll”, or about the size of a small egg.
- Get them crispy – many picky eaters prefer a crunch to their food and they can tell from a mile away if a food is soggy. Make sure you brush them with egg whites as I share in the recipe for extra crispiness. You can also slightly overcook them.
- Keep it simple – choose one ingredient that your child likes (cheese?) and one that’s new to them to stuff inside, unless they have several foods they’ll willing to eat that you have on hand. The more ingredients you add, the less likely they’ll be to eat it.
If you’re struggling with picky eating and want more help check out my free workshop, I’ll teach you the three most important tips you need to know to help your child overcome it.
So Many Homemade Hot Pocket Options!
Well, the sky is the limit when it comes to what to put inside you’re hot pocket. You can honestly use all sorts of combinations. Get creative and use you’re leftovers to keep it quick and do-able. Keep in mind that these hot pockets freeze well, so you can double your batch and use for another dinner or even a fast breakfast or packed lunch.
Before I share our specific recipe, here is a list of homemade hot pocket ideas to inspire you:
- Mozzarella Cheese + Spaghetti Sauce + Pepperoni/Sausage/Peppers (aka the pizza hot pocket)
- Ricotta Cheese + Spinach + Chicken
- Roast Beef + Mashed Potatoes
- Ham + Cheddar Cheese + Broccoli
- Scrambled Eggs + Ham/Sausage/Bacon + Tomatoes/Onions/Spinach (aka the breakfast hot pocket)
- Feta/Goat Cheese + Peppers/Onions/Broccoli/Spinach/Tomatoes/Squash (aka the vegetarian hot pocket)
- Ricotta Cheese + Spaghetti Sauce + Diced Meatballs/Ground Meat (aka the lasagna hot pocket)
Just remember that if your child tends to be a little picky, you don’t want to decide on the filling from left field. Choose wisely, incorporating something you know they like. Once your child does readily eat these homemade hot pockets, you can try different ingredients, expanding their variety of foods as you make the recipe again and again.
How to Make Homemade Hot Pockets!
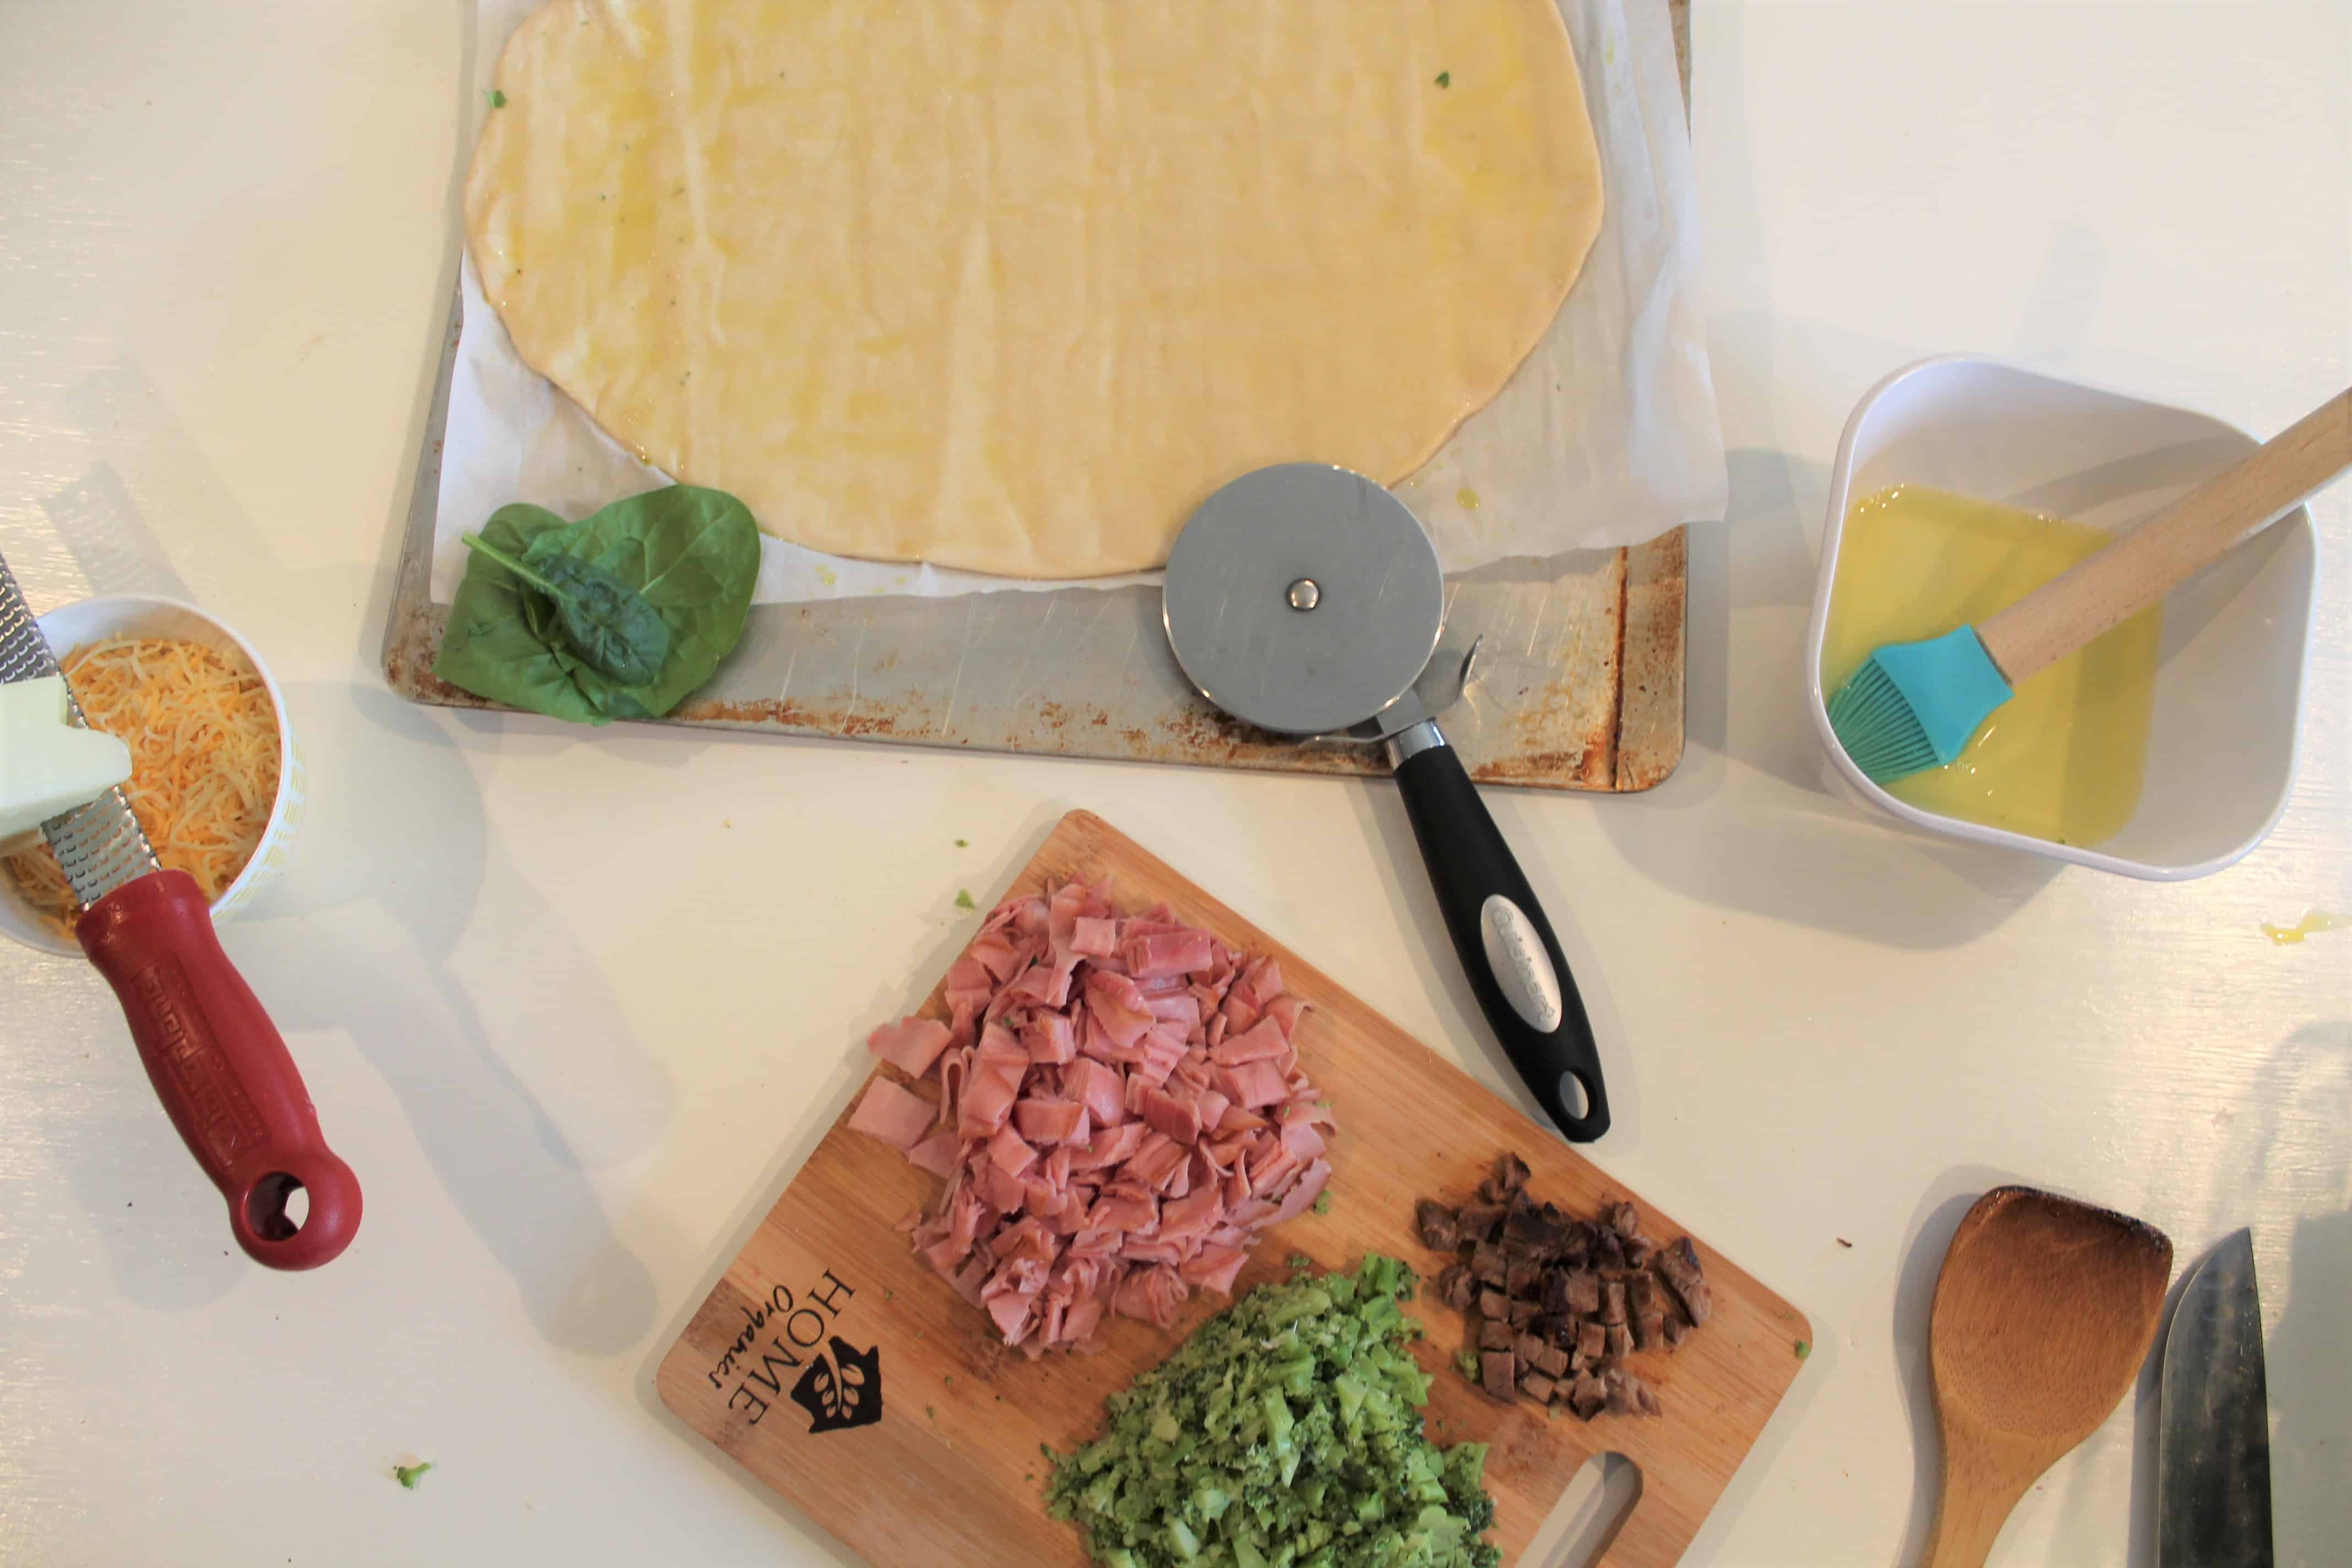
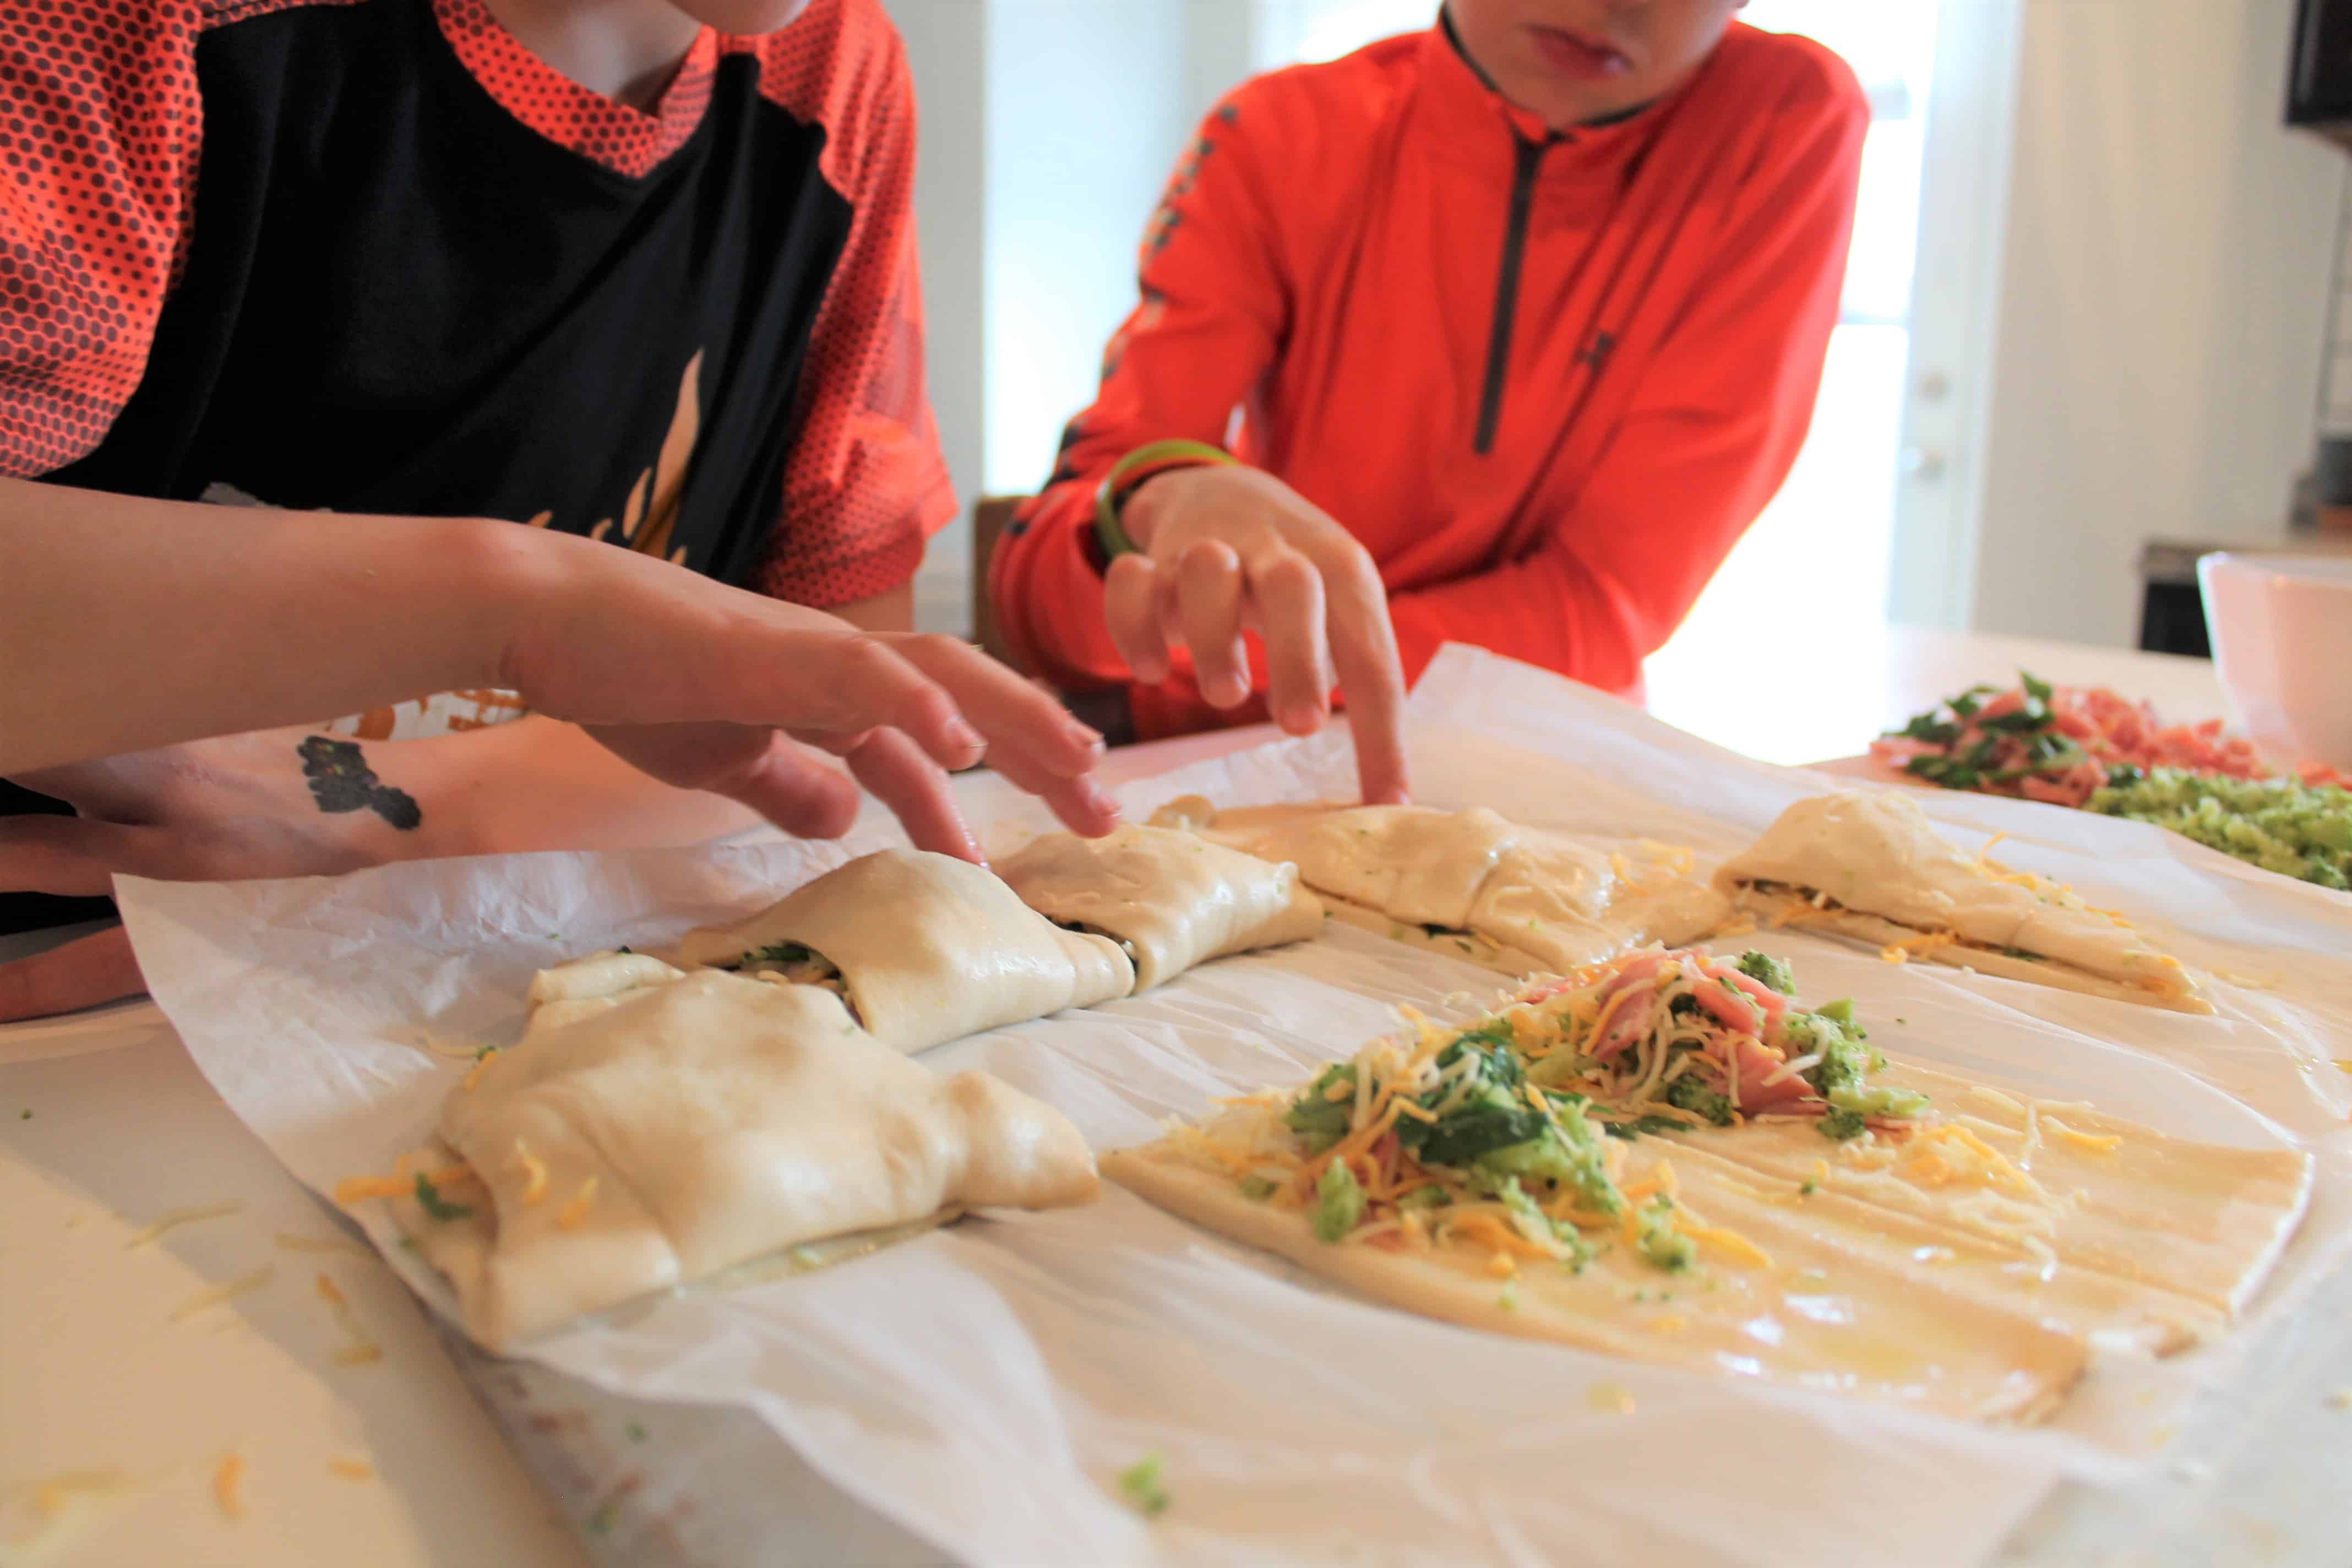
This past week we stuffed our hot pockets with ham, cheese, and broccoli as one option, as well as roasted pork, spinach, and cheese. The latter was a leftover. I’m going to show you exactly how we made them.
1. First, we started off with a pre-made refrigerated pizza dough, but if you want to make yours from scratch you can use this recipe. I unrolled my pizza dough and kept it on a piece of parchment paper for easy handling. I also got all of the other ingredients I was planning on using ready: diced ham, spinach, broccoli, cheese, egg whites, and leftover diced pork chop ready.
You’ll want to pre-heat your oven at this point too. Follow your dough recipe, but around 400 degrees should be good!
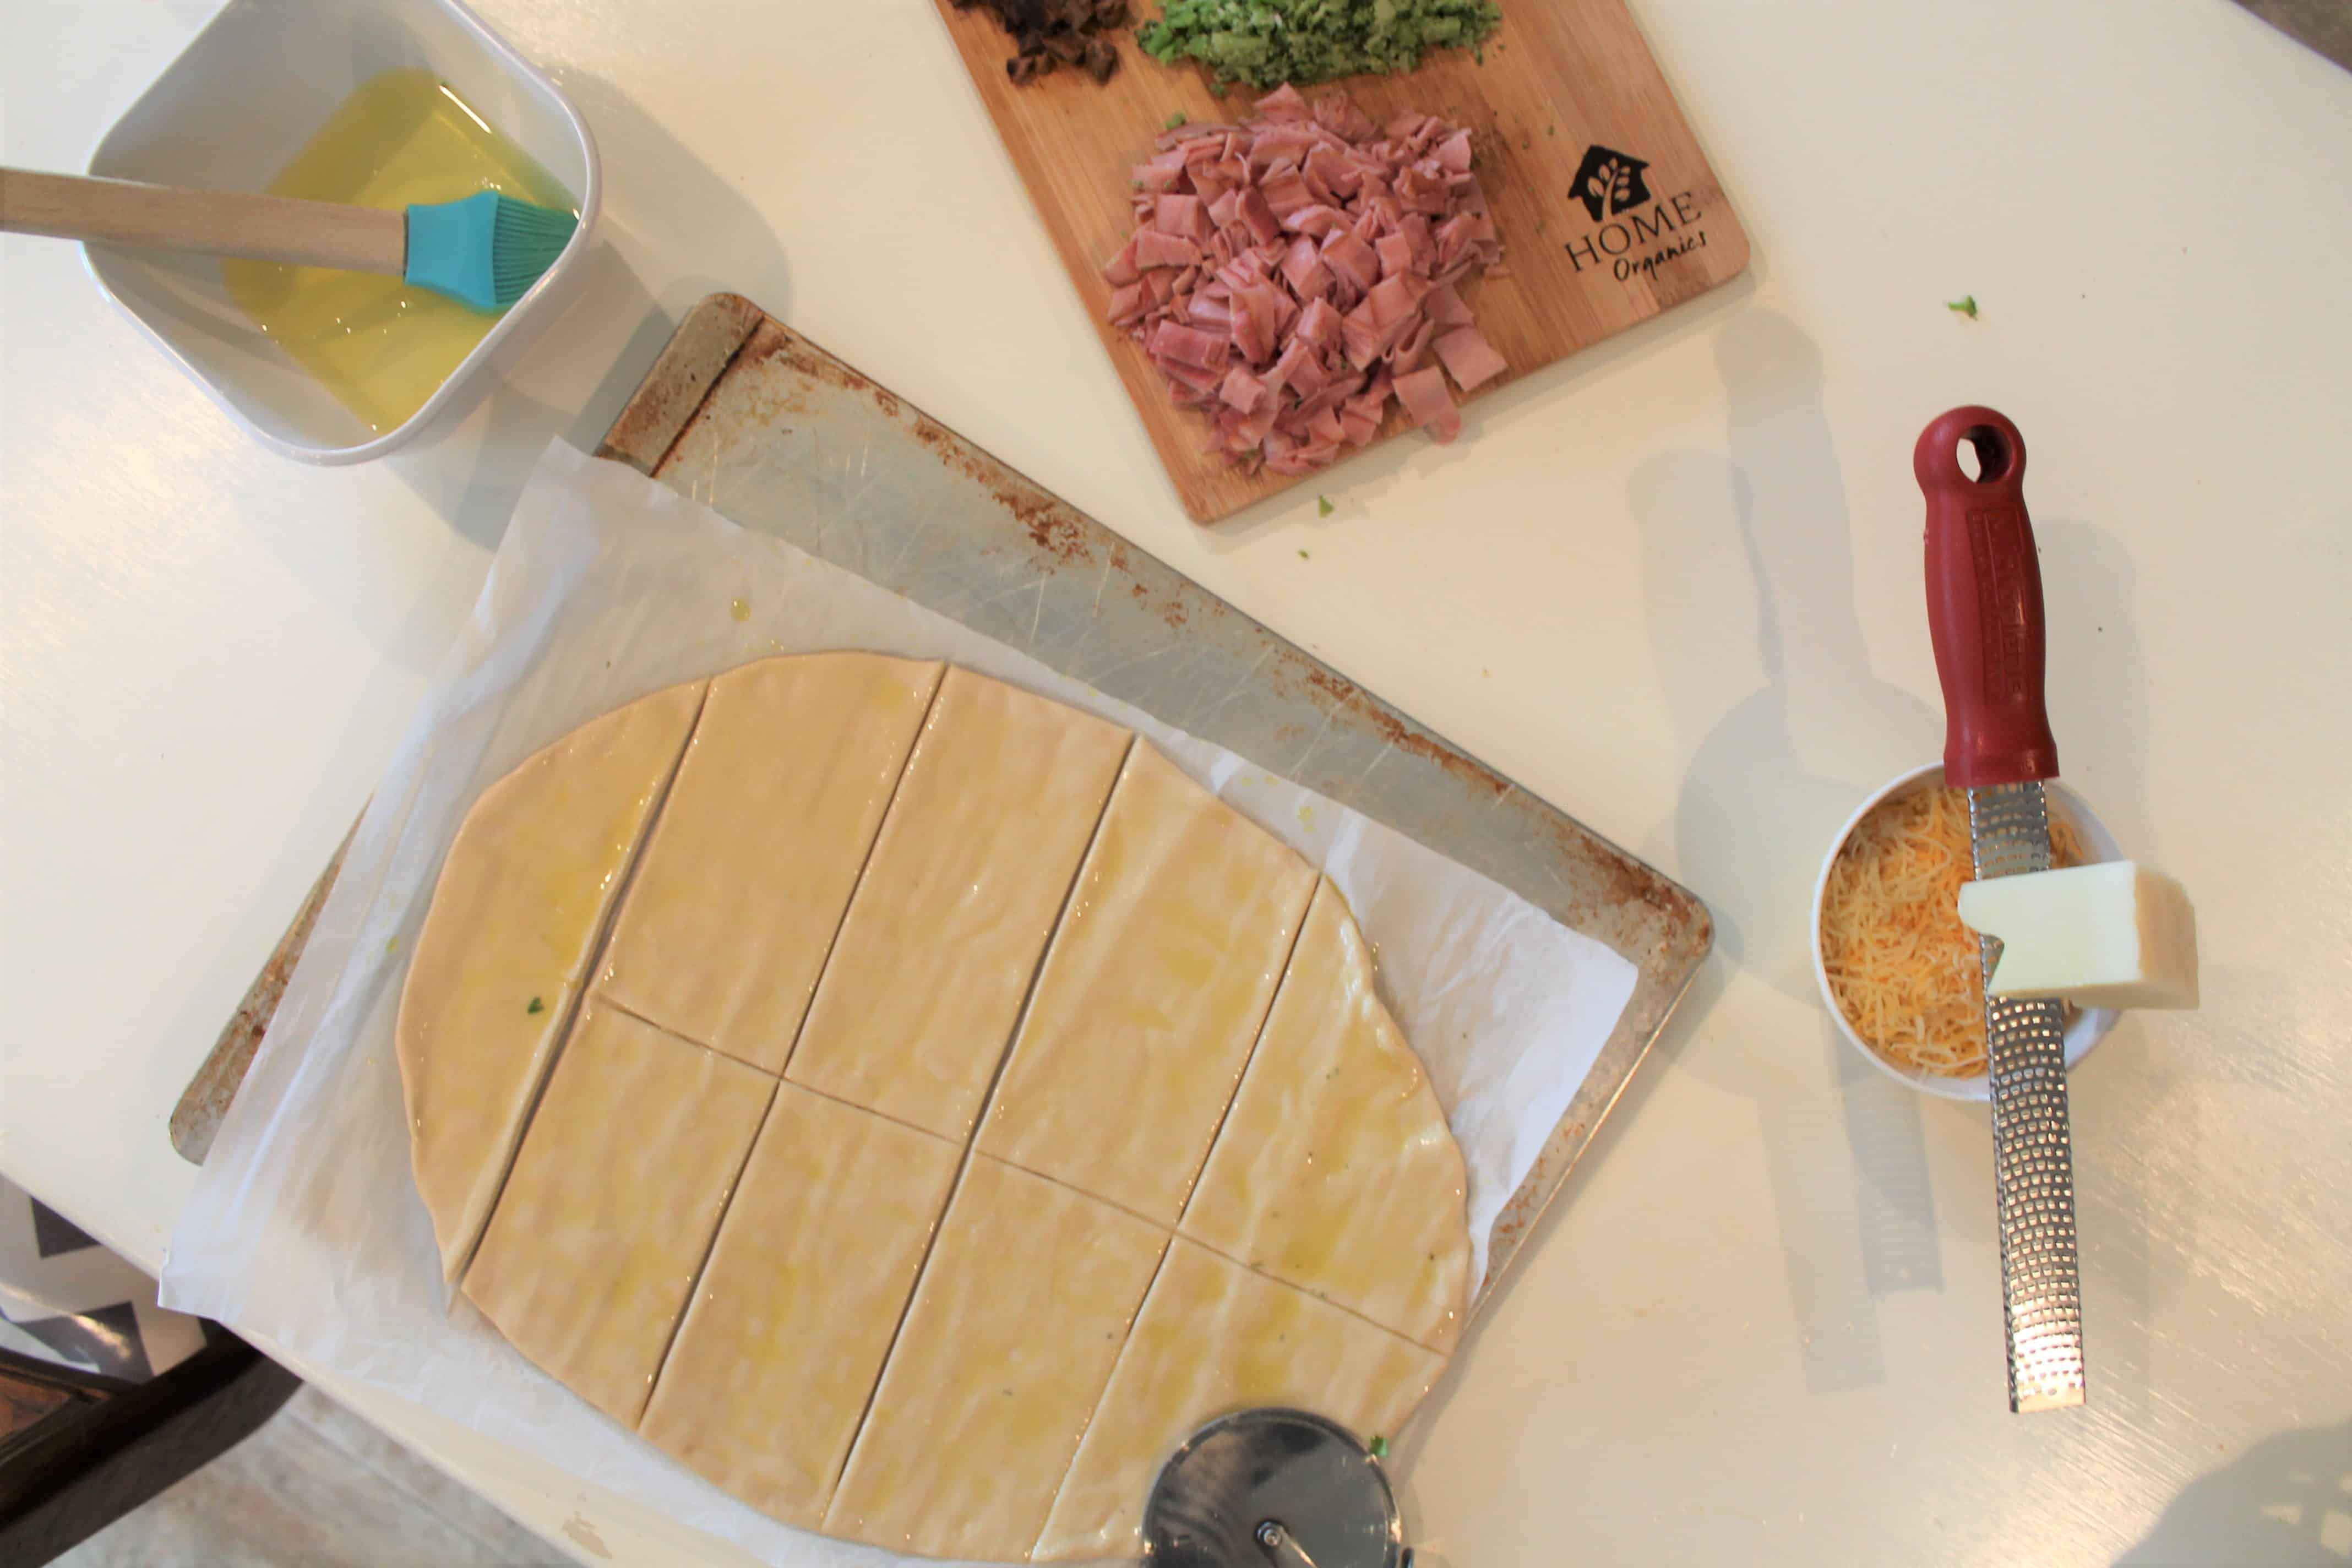
2. I cut our dough into rectangles. I was working with a circular shaped pizza shell so I had to get creative with my cutting. If you’re making your own, shape your dough into a large rectangle, cutting your hot pockets into squares allows them to be easily folded into triangles. Having said that, don’t worry too much about the shape, you can always fold them in half later.
For kids, you’ll want to aim for 8-10 sections, as I mentioned above, smaller is usually better, especially for picky eaters and toddlers.
3. Now its time to start adding your filling! Again, this is much easier if you have everything prepped in advance. I love to set up a handful of options so that kids can choose for themselves what they’d like to add.
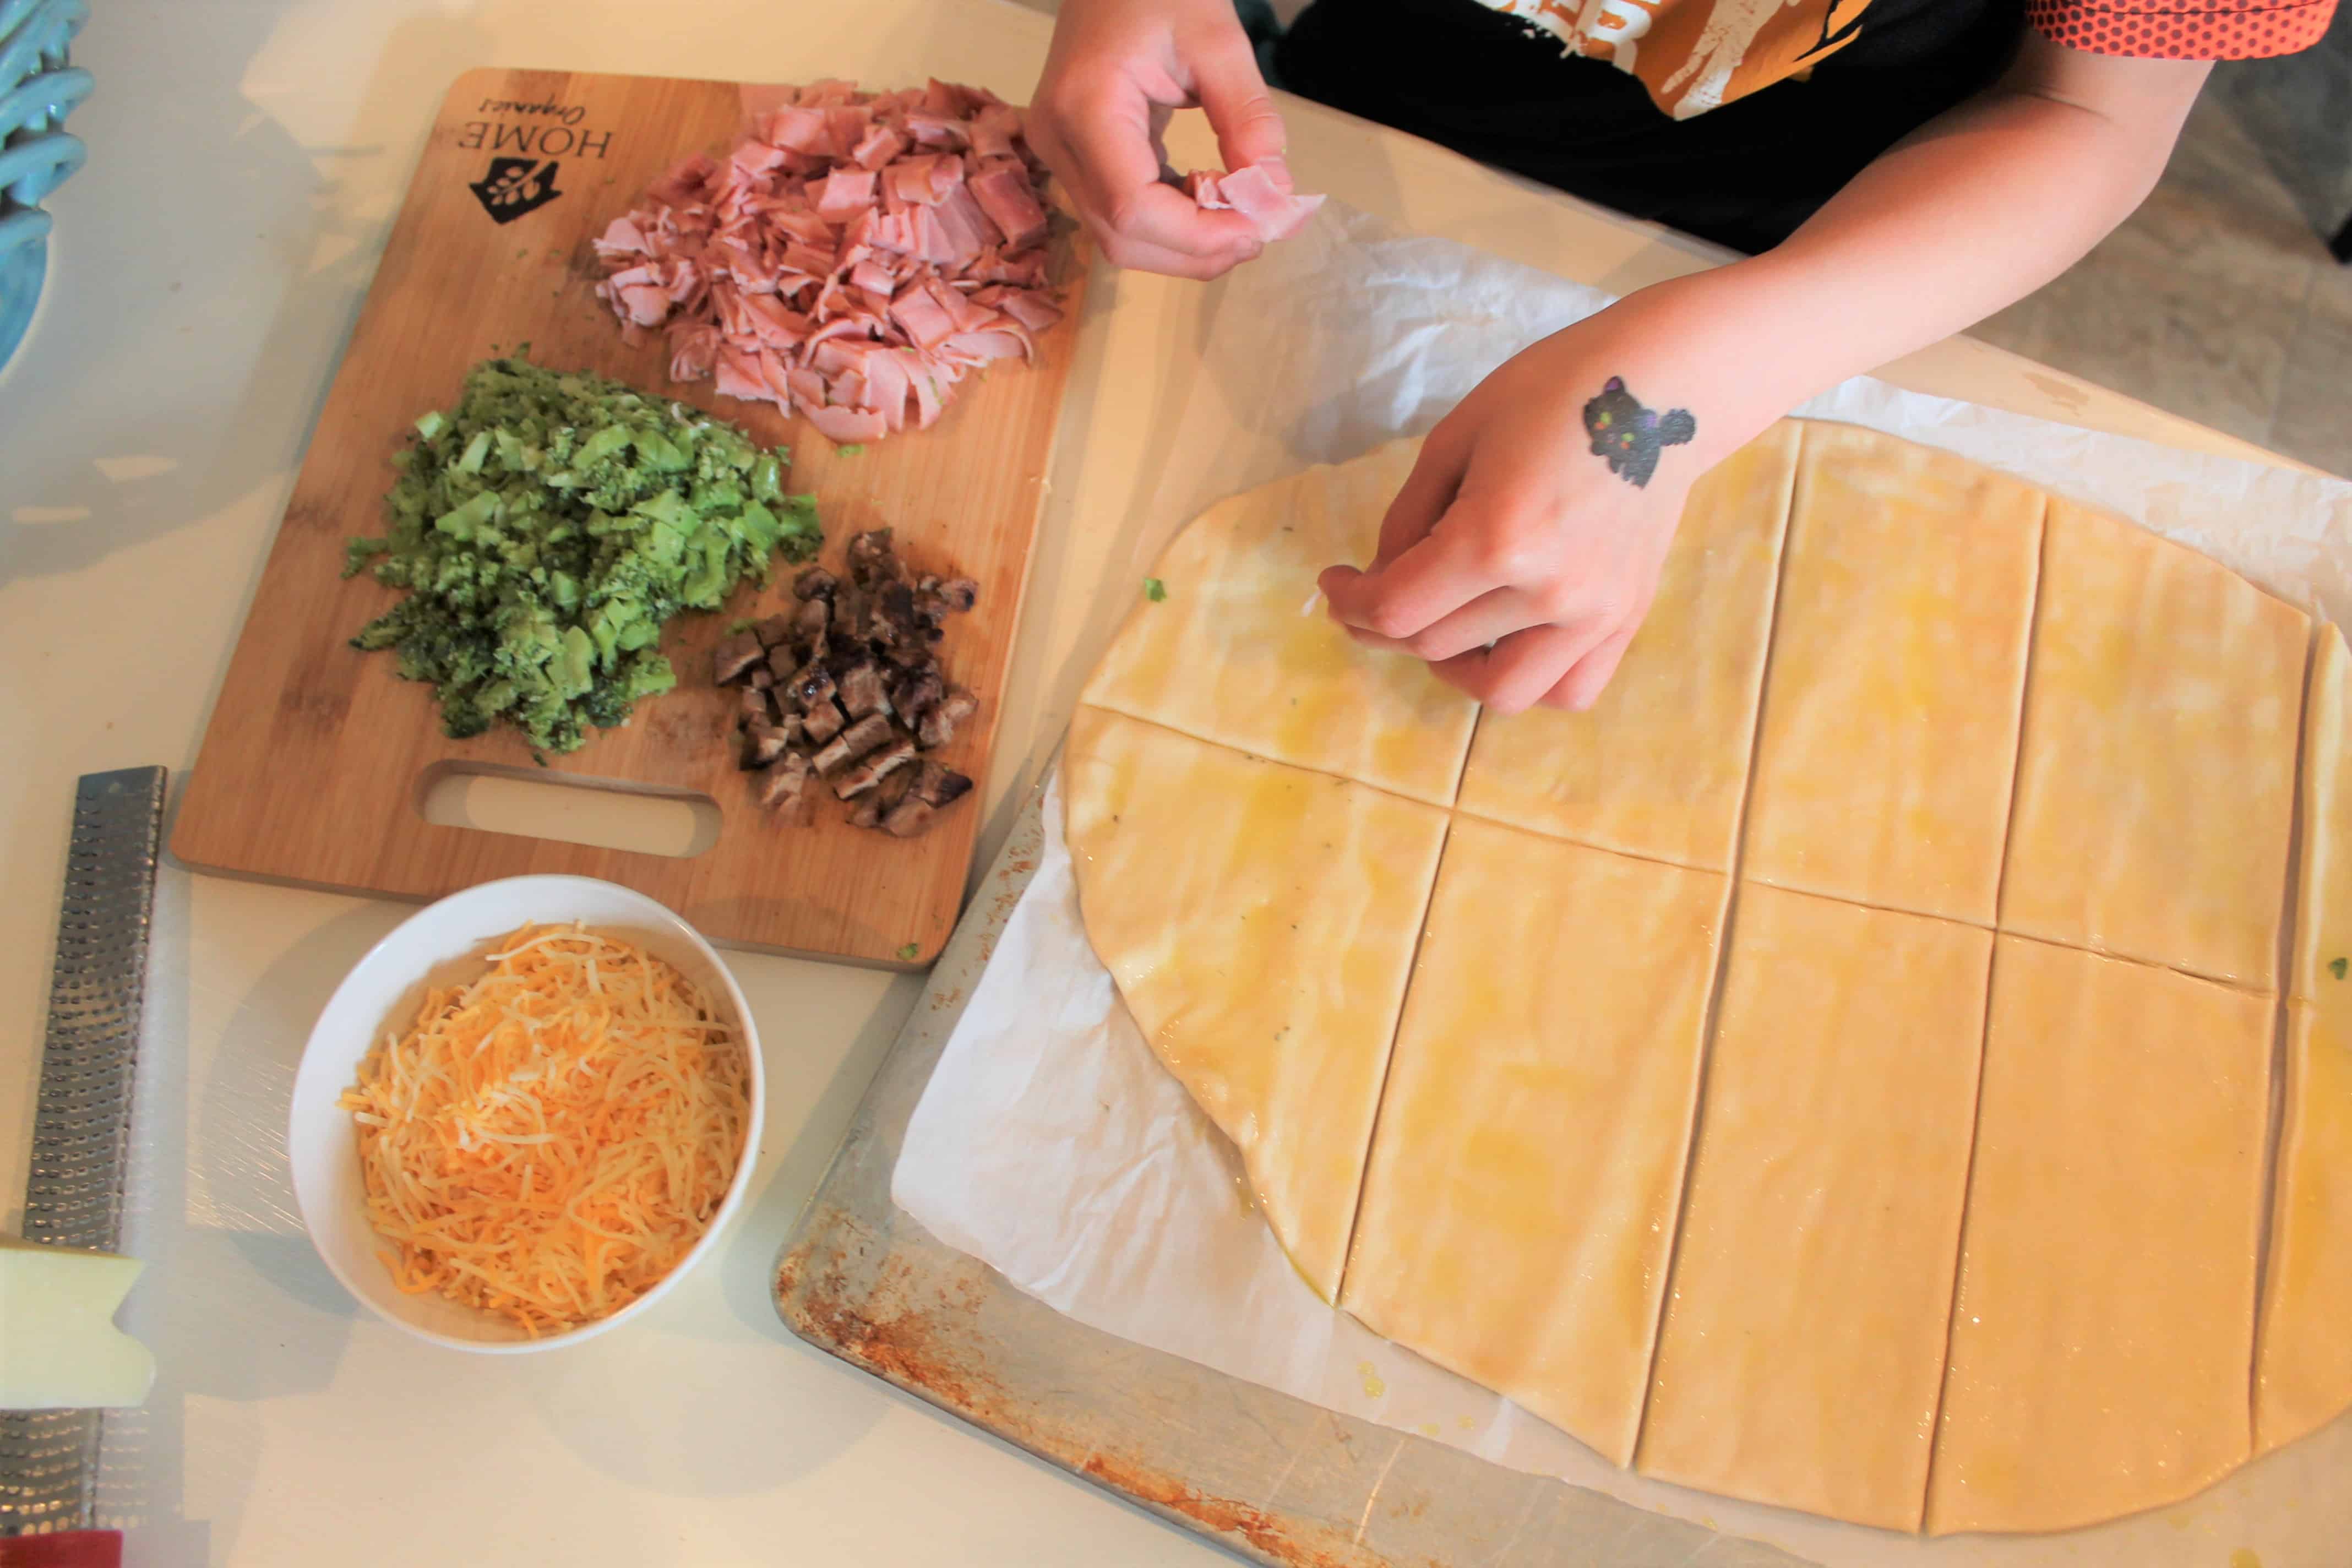
Personally, I give them the guideline that they need one protein and one veggie inside of each. Make sure that you’ve placed your ingredients in a pile to one end of the shape you cut out so that you can fold over the other half of the crust, also leaving room at the edges to seal it closed.

4. Then it’s time to fold them over, or “pull the blanket” on top!
5. Grab a fork and begin to crimp down any open edges. If the edges don’t seem to be sealing, use some of your egg white as glue. Once all the edges are crimped, paint the egg whites on top of each homemade hot pocket.
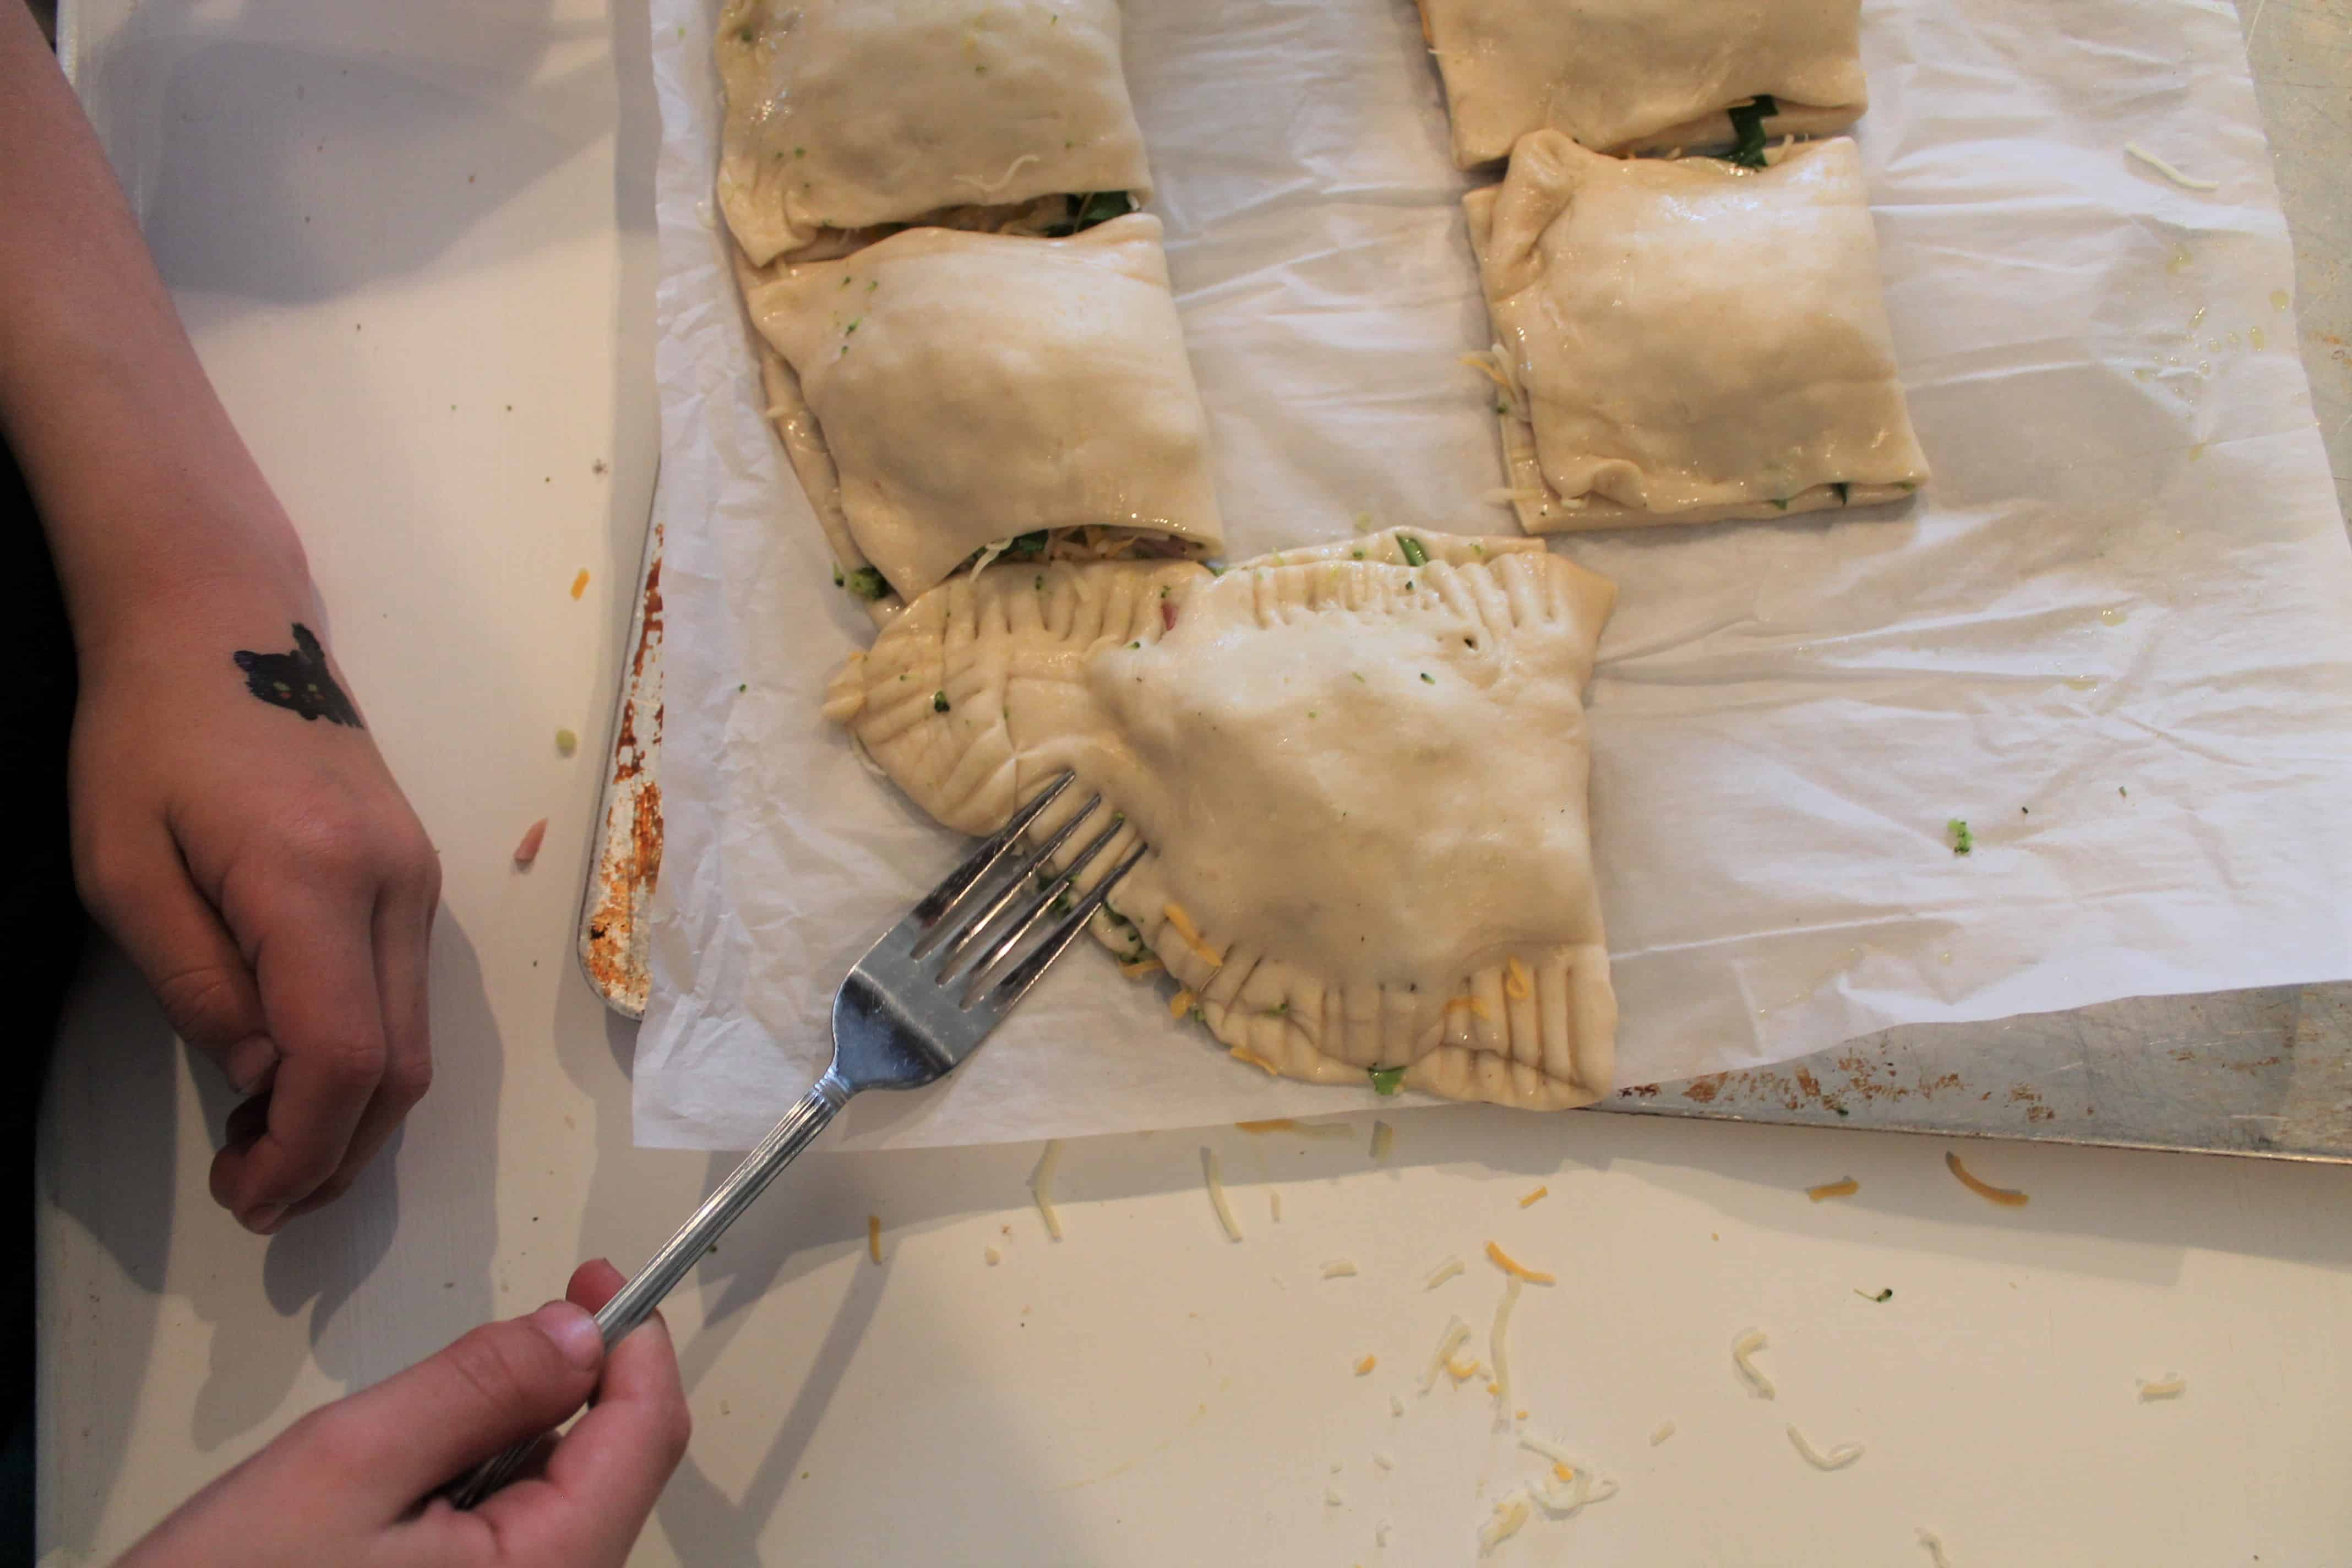
6. Lastly, poke a few vent holes into the top of each one. My kids put special designs into the ones they made so they could identify them once they came out of the oven.
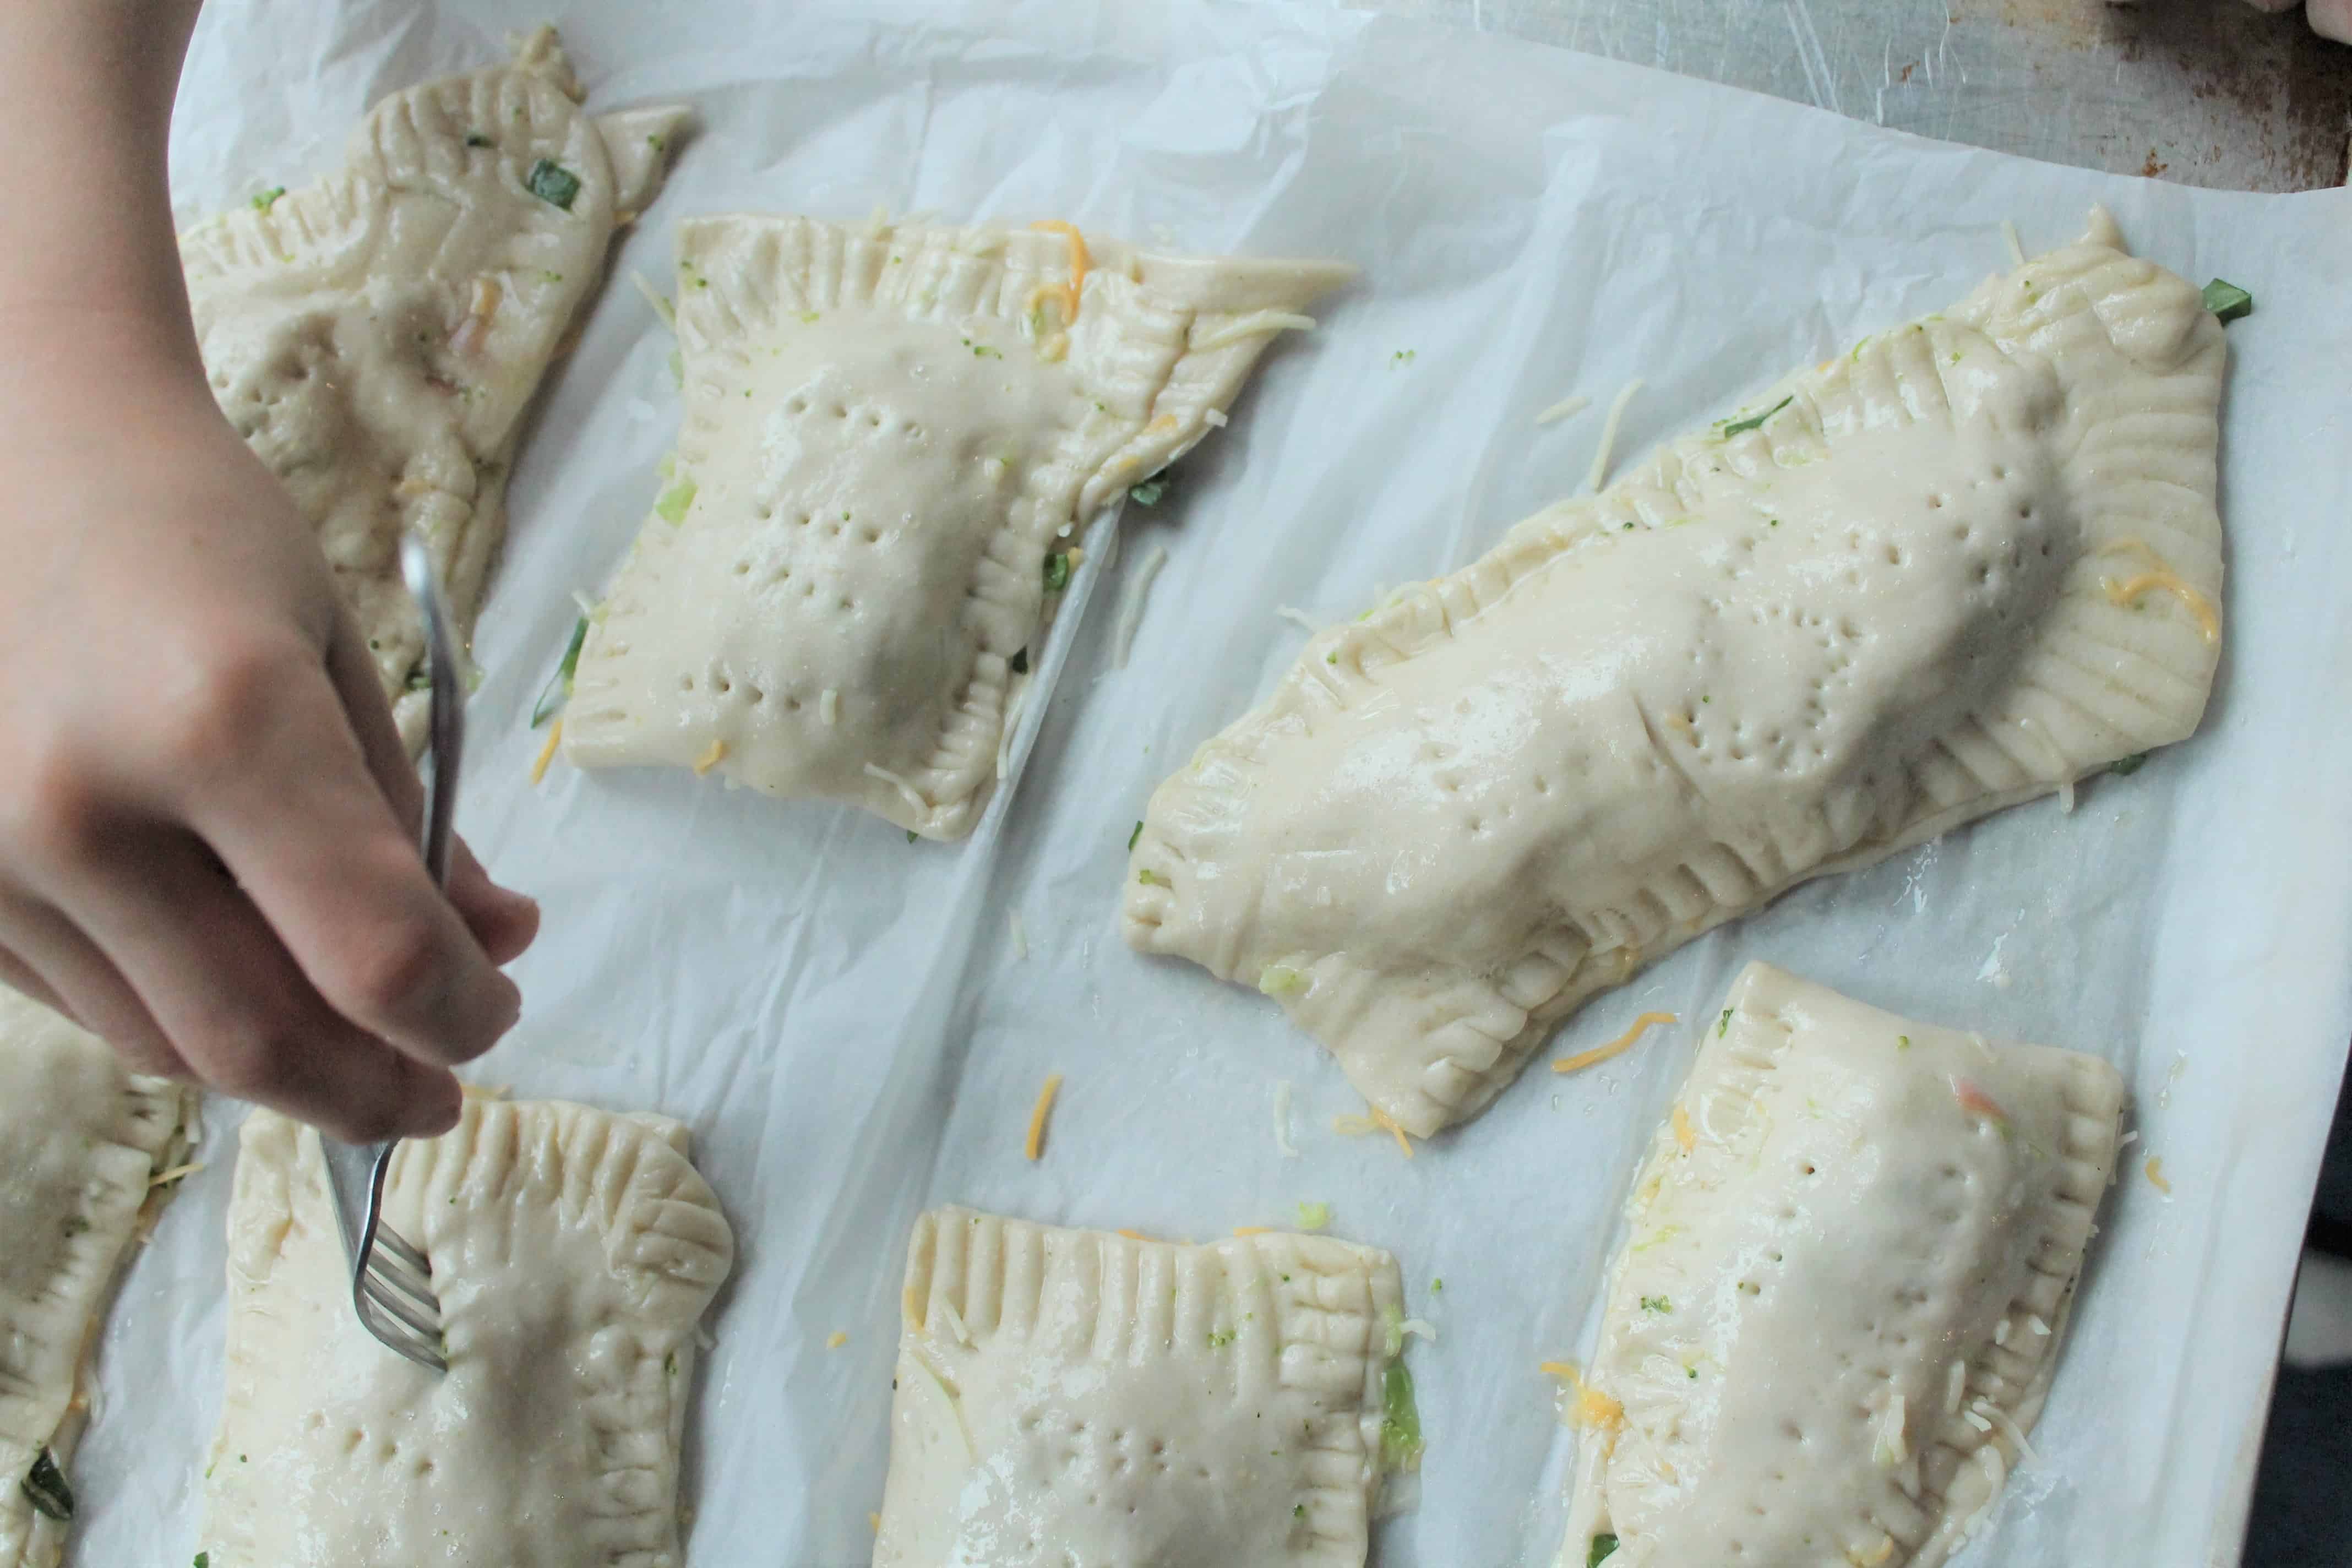
7. Place in the oven until browned on top, usually around 20-30 minutes depending on the size of your hot pockets. Let cool for a few minutes and serve!
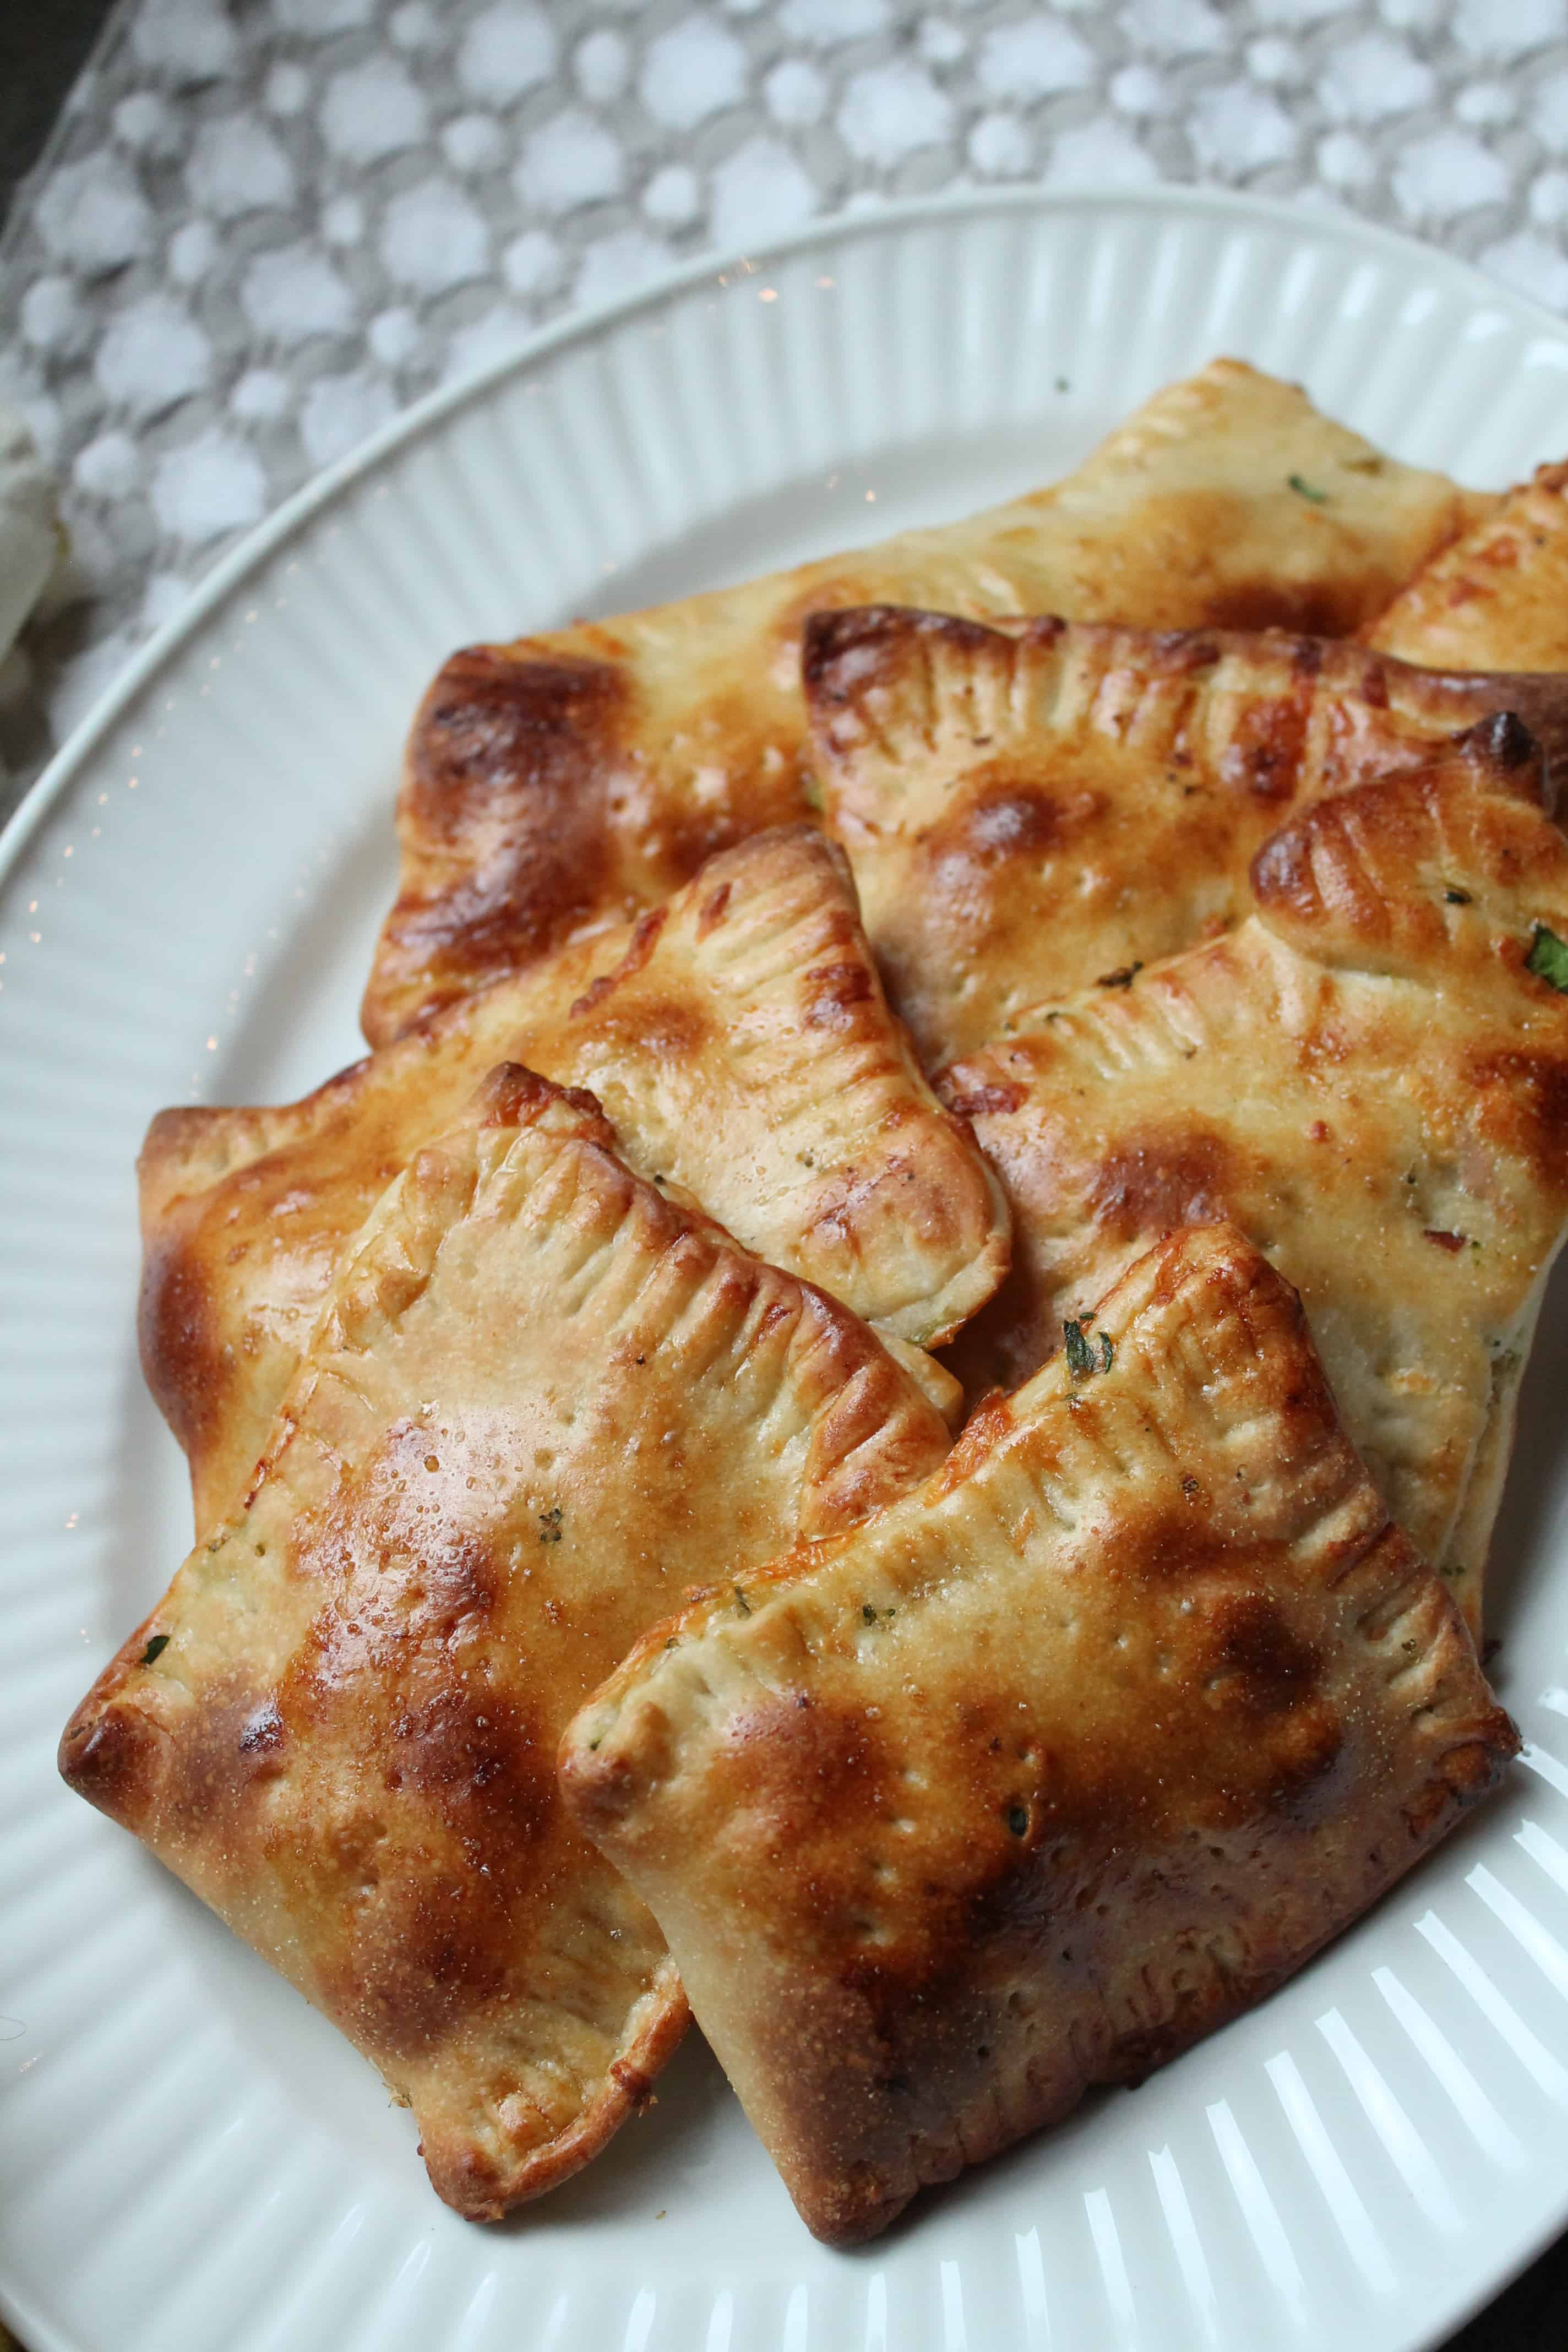
Don’t they look good? Which one’s are you going to try? Tell me in the comments below.
The Homemade Hot Pockets Recipe

Ham and Cheese Homemade Hot Pockets
Homemade ham and cheese hot pockets recipe
Ingredients
- 1 Refrigerated pizza crust
- 3/4 cup Shredded cheddar cheese
- 3/4 cup Minced broccoli
- 3/4 cup Ham
- 1 Egg white
Instructions
-
Preheat oven to pizza crust instructions, usually around 400 degrees.
-
Cut pizza crust into 8-10 rectangles.
-
Place cheese, ham, and broccoli on one half of each rectangle being careful to keep food off of edges.
-
Fold over the empty side of the rectangle, covering the ingredients on each rectangle.
-
Crimp the edges of the pockets closed with a fork. Use egg white in between any edges that aren't sealing well.
-
Brush the top with the egg white.
-
Poke a few vent holes in each of the hot pockets with a fork.
-
Cook for 20-30 minutes, or until browned on top. Cooking time will vary based on size of hot pockets. Allow to cool for a few minutes and serve!
More Recipes Kids (and Picky Eaters)
The Easiest Homemade Mild Taco Seasoning Recipe
19 Nutritious Bedtime Snacks For Kids
The Greatest Toddler Breakfast Ideas, Easy + Healthy
Cooking with Your Kid: Pumpkin Waffles
Did you pin this?
Pin this to your recipe board so you know where to find it!
Alisha Grogan is a licensed occupational therapist and founder of Your Kid’s Table. She has over 14 years experience with expertise in sensory processing and feeding development in babies, toddlers, and children. Alisha also has 3 boys of her own at home. Learn more about her here.
These look delicious! Do you par-cook the vegetable before, like broccoli?
Hi – would the cooking time differ if cooking from frozen? And would you recommend defrosting at all? Thanks! I want to make a bunch of these, great for my house because I’m a vegetarian and I love having quick options for myself without depriving anyone else of meat:)
Hey Lori, I’d recommend thawing them and then cooking normally. If you are cooking straight from the freezer you would need to experiment with cooking time 🙂
Best,
Desiree
These look great and I love all of the different suggestions! Can you advise if you freeze the extras before or after baking them?
I froze them after baking them. I’ve never tried to freeze the uncooked dough before, but ours froze well after baking.
A smashing article. These are perfect for cooking with my daughter. And it’s true, with ingredients hidden away, it means that the food often gets past the visual radar and into the mouth for the all-important first taste! Definately half the battle! 😉
We tried the Mozzarella Cheese + Spaghetti Sauce + Peppers (aka the pizza hot pocket) but swapped out the peppers for zucchini and mushrooms (she doesn’t like peppers, don’t understand why!)
Neve x
Yay! I love hearing that! Thanks for sharing your experience, hopefully your combination will inspire someone else!